Showing posts with label Cheesecakes. Show all posts

Tuesday, May 26, 2026

Japanese-style Soufflé Cheesecake


Soft, light, and beautifully jiggly, this Japanese-style soufflé cheesecake is the perfect balance between airy sponge cake and creamy cheesecake. With its delicate texture and gentle sweetness, every bite melts in your mouth. A simple yet elegant dessert that’s perfect for tea time, celebrations, or whenever you crave something light and comforting.


Ingredients

- 120g cream cheese
- 30g unsalted butter
- 70 ml milk
- 25g cake flour
- 10g cornstarch
- 3 medium eggs, separated
- 50g sugar 

Instructions

1. Prepare the pan and oven
- Line the bottom and sides of the cake pan with parchment paper.
- If using a loose-bottom pan, wrap the outside very well with aluminum foil to prevent water leaking in.
- Place a large baking tray in the oven and fill it with hot water so it will reach about halfway up the cake pan later.
- Preheat oven to 150°C.
- Water bath helps prevent cracks and keeps the cake soft and even.
2. Separate the eggs
- Separate yolks in one bowl, whites in a completely clean, grease-free bowl.
- No yolk in the whites, or the meringue may not whip properly.
3. Melt cream cheese mixture
- In a saucepan over low heat, add cream cheese, butter and milk.
- Stir slowly until completely smooth. Do NOT boil.
- Once smooth, remove from heat. The mixture should feel warm, not hot.
4. Add dry ingredients
- Sift in flour and cornstarch.
- Whisk gently until smooth and lump-free.
5. Add egg yolks
- Add egg yolks, mix well. The batter should now be smooth, glossy, and slightly thick.
- Set aside.
6. Make the meringue
- Start whipping egg whites on low speed.
- When foamy, gradually add sugar in 3–4 additions.
- Increase speed slowly and continue whipping until soft peaks stage. Do NOT overwhip.
7. Fold gently
- Add 1/3 of the meringue into the cream cheese batter.
- Mix gently to loosen the batter.
- Then add the remaining meringue in 2 more additions.
- Use a spatula and fold carefully from bottom to top.
- Do not stir aggressively or you’ll lose the air. The final batter should be light, fluffy, and smooth.
8. Pour into pan
- Pour batter into prepared pan.
- Tap the pan gently 1–2 times to remove large air bubbles.
- Do not over-tap.
9. Bake
- Place cake pan into the hot water bath.
- Bake for 30 minutes at 180°C.
- Turn the heat to 160°C and bake another 20 minutes.
- When you touch the surface, and it bounces back, it's cooked.
- Let it cool in the oven.
10. Remove from oven.
- Gently flip onto a plate, then flip back upright onto another plate.
- Best served slightly warm. This is when it’s most jiggly and fluffy.
- Store leftovers in fridge for 2–3 days.

Polish Sweet Cheese Strudel With Walnuts and Raisins - Strucla z Serem


Soft, fluffy, and filled with a rich sweet cheese filling and juicy raisins, this traditional Polish-style cheese strudel (strucla z serem) is pure homemade comfort. Perfect for breakfast, dessert, or with a cup of coffee or tea, this classic pastry combines a light yeast dough with a creamy vanilla cheese filling for a delicious treat that’s hard to resist.


Ingredients

The Dough:

- 200 g bread flour
- 4 g instant yeast
- 40 g sugar
- 70 ml warm milk
- 1 Egg yolk (save the white for the filling)
- 45 g unsalted butter (melted and slightly cooled)

Filling:

- 50 g raisins 
- warm water or orange juice (for soaking)
- 200 g cream cheese (room temperature)
- Remaining eggeWhite
- 30 g powdered sugar

Crumble:

- 30g butter 
- 25g sugar
- 50g flour  

Instructions

1. Prep the Raisins:
- Place the raisins in a small bowl and cover with warm water or juice. 
- Let them soak for 15 minutes. 
- Drain and pat them very dry with a paper towel. This keeps them plump and prevents them from burning in the oven.
2. Make the Crumble
- In a small bowl, combine flour and sugar and cold butter cubes.
- Rub the mixture between your fingertips (or use a fork/pastry cutter) until it forms coarse crumbs — similar to wet sand or small pea-sized bits.
- Keep the crumble in the fridge while you prepare and shape the dough (it should stay cold until baking).
3. Prepare the Dough:
- In a large bowl, whisk the flour, yeast, sugar, and salt. Add the milk, egg yolk, and melted butter. 
- Knead for about 10 minutes until the dough is smooth and elastic. 
- Cover and let rise in a warm spot for 60 minutes (it should double in size).
4. Prepare the Filling:
- Whisk the cream cheese, egg white, powdered sugar, and vanilla together until completely smooth.
5. Shape and Twist:
- Roll the risen dough into a rectangle (roughly 20 x 30 cm).
- Spread the cream cheese filling evenly, leaving a 2 cm border at the edges.
- Sprinkle the plumped raisins generously over the cheese.
- Roll the dough tightly starting from the long side to create a log.
Pro Tip: Place the log in the freezer for 10 minutes before cutting; this makes the next step much cleaner.
6. The Cut:
- Using a very sharp knife, cut the log in half lengthwise. 
- Turn the two strips so the open layers of cheese and raisins are facing up. 
- Twist the two strands over each other, keeping the "open" side visible.
7. Final Proof:
- Place the twist into a greased loaf tin or onto a parchment-lined tray. 
- Cover and let rise for 45–60 minutes. It should look puffy and "alive."
8. Bake:
- Preheat your oven to 175°C. 
- Brush the top of the dough (not the cheese) with a little milk. 
- Bake for 30–35 minutes. If the top browns too quickly, tent it with foil for the last 10 minutes.
9. Finishing:
- Let it cool for at least 20 minutes before slicing. 
- The cream cheese needs time to "set," or it will be messy when cut. 
- Drizzle with icing or a simple honey glaze if you want an extra shine.

Friday, March 27, 2026

Pumpkin Crumble Cheesecake


This Pumpkin Cheesecake combines the best of both worlds: a rich, velvety cheesecake filling and a buttery, crumbly shortcrust. The base and top are made from a lightly sweetened, grated dough that bakes into a delicate, golden crumble, while the filling is smooth, creamy, and subtly spiced with pumpkin and cinnamon.

Perfect for autumn gatherings, cozy afternoons, or holiday dessert tables, this cake is easy to slice and beautifully layered. The natural sweetness of pumpkin pairs wonderfully with the tang of cream cheese, creating a moist, flavorful bite every time. It’s an approachable, elegant dessert that’s both comforting and impressive—ideal for sharing or enjoying with a cup of coffee or tea.


Ingredients

Dough:

- 120 g cake flour
- 3 g baking powder
- 15 g brown sugar
- 60g g cold butter, cubed
- egg yolk (save the white for later)

Pumpkin Cheesecake Filling:

- 250 g cream cheese, room temperature
- 150 g steamed pumpkin or pumpkin purée
- 50 g sugar
- 20 g cornstarch
- 2 eggs + 1 extra egg white
- Pinch of cinnamon (optional)

Instructions

1. Prepare the Dough
- In a large bowl, mix flour, baking powder and sugar.
- Add cold butter cubes and rub into the dry ingredients with your fingertips until the mixture looks like coarse crumbs.
- Add egg yolks and quickly bring the dough together—do not overknead.
- Wrap the dough in cling film and refrigerate for 1 hour.
2. Make the Cheesecake Filling
- In a bowl, mix cream cheese with sugar until smooth.
- Add the eggs and 1 egg white, mixing one at a time.
- Add the pumpkin purée, cornstarch, and cinnamon.
- Blend or whisk until the mixture is completely smooth.
3. Assemble
- Line a 6-inch (15 cm) square tin with baking paper.
- Preheat the oven to 180°C (356°F), top–bottom heat.
- Grate the chilled dough on a coarse grater.
- Spread half of the grated dough into the tin and gently press to form the base.
- Pour in the cheesecake filling.
- Sprinkle the remaining grated dough evenly over the top.
4. Bake
- Bake for 40–45 minutes, until the top is lightly golden and the cheesecake is set in the center.
- Turn off the oven, crack the door open slightly, and let the cake cool inside for 10–15 minutes.
- Remove and cool completely on a wire rack before slicing.

Tuesday, March 24, 2026

Burnt Pumpkin Cheesecake (Basque Style)


This pumpkin Basque cheesecake is the ultimate fall dessert—rich, creamy, and beautifully caramelized on top. With warm pumpkin spice flavors and a soft, custardy center, it’s a cozy twist on the classic burnt cheesecake. No crust, no water bath, and incredibly easy to make!


Ingredients

- 250 g cream cheese, room temperature
- 150 g heavy cream, room temperature
- 2 eggs, room temperature
- 80 g sugar 
- 150 g thick pumpkin puree (well-drained)
- 25 g cornstarch 
- 1 tsp vanilla extract (optional)
- ⅛ tsp cinnamon or nutmeg (optional)

Instructions

1. Pumpkin Prep (must be thick)
- Steam or roast pumpkin
- Blend until smooth
- Strain 10–15 minutes (Texture should be thick like cream cheese, not watery)
2. Prepare the Bakin Tin
- Preheat to 240°C (465°F)
- Line a 6-inch round pan with parchment paper, letting it rise 3–4 cm above the rim.
3. Prepare the Cheesecake Batter
- Beat cream cheese with sugar until silky smooth, no lumps.
- Add eggs one at a time, mixing on low–medium speed.
- Add pumpkin puree, heavy cream, cornstarch, vanilla, and spice (if using).
- Mix on low speed just until smooth. Do not overmix (prevents cracks & bubbles).
- Pour into pan and gently tap once or twice.
4. Bake (Burnt Top)
- Bake at 240°C for 25 minutes
- Top should be deeply browned / almost burnt. Center should wobble like jelly.
- Let cool at room temperature 1–2 hours.
5. Serve
- Chill 2–3 hours for cleaner slices.

Passionfruit Basque Cheesecake


This Passionfruit Basque Cheesecake is rich, creamy, and slightly caramelized on top, with a bright, tangy twist from passionfruit. The naturally burnt exterior contrasts perfectly with the soft, custardy center, while the passionfruit adds freshness and a tropical flavor.
It’s an easy, crustless cheesecake—no water bath needed—making it perfect for both beginners and experienced bakers.


Ingredients

- 250 g cream cheese (room temperature)
- 60 g sugar
- 2 eggs
- 120 ml heavy cream
- 15 g cornstarch
- 45 ml passionfruit juice
- Extra passionfruit pulp (for decoration)

Instructions

1. Preheat oven to 220°C (428°F).
2. Line a 6-inch (15 cm) baking tin with parchment paper, allowing it to overhang the sides.
3. In a bowl, mix cream cheese with sugar until smooth.
4. Add eggs one at a time, mixing well after each addition.
5. Pour in heavy cream and mix until combined.
6. Add cornstarch and passionfruit juice, then blend until smooth and lump-free.
7. Pour the batter into the prepared pan.
8. Spoon a little passionfruit pulp on top for decoration.
9. Bake at 220°C for about 25 minutes, until the top is deeply golden and slightly burnt.
The center should still be slightly jiggly.
10. Let the cheesecake cool completely at room temperature.
11. Refrigerate for at least a few hours (preferably overnight) before serving for the best texture.

Tips
- The center will set as it chills—don’t overbake.
- Passionfruit seeds are edible and add a nice crunch, but you can strain them if you prefer a smoother texture.

Thursday, July 3, 2025

Lemon Basque Cheesecake


Lemon Basque Cheesecake is a rich, creamy cheesecake with a caramelized top and juicy bursts of tart lemon juice. This Basque-style cheesecake is beautifully imperfect - baked at a high temperature to achieve a deeply golden, slightly cracked top, while staying irresistibly soft and creamy inside. The lemon add a bright, tangy contrast to the sweetness of the batter, creating a wonderful balance of flavors in every bite. No crust needed - just parchment paper and a hot oven for that signature rustic edge. It's perfect for 2–4 people, or a few indulgent servings over a few days.


Ingredients:

- 250 g cream cheese, at room temperature
- 120 g heavy cream, at room temperature
- 2 eggs, at room temperature
- 60 g sugar
- 20 g flour or cornstarch
- 1 lemon – zest and juice

Instructions:

1. Preheat the oven to 220°C (425°F). Line the bottom of a 6-inch baking pan with parchment paper.
2. Zest the lemon and combine the zest with the sugar. Rub them together until the sugar is slightly moist and lightly green in color.
3. Squeeze the lemon juice and set it aside.
4. In a mixing bowl, cream the room-temperature cream cheese with the lemon sugar until smooth and creamy.
5. Add the eggs one at a time, beating well after each addition until fully incorporated.
6. Pour in the heavy cream, add cornstarch and lemon juice, and blend until the mixture is smooth.
7. Pour the cheesecake batter into the prepared baking pan and smooth the top with a spatula.
8. Bake in the preheated oven for 20–30 minutes, or until the top is set, puffed, and the center is slightly jiggly.
9. Remove the cheesecake from the oven and let it cool in the pan for about 30 minutes at room temperature.
10. Transfer the cheesecake to the refrigerator (still in the pan) and chill for at least 4 hours or until fully set.
11. Once set, carefully remove the cheesecake from the pan, slice, and serve.

Monday, June 2, 2025

Cherry Basque Cheesecake


Cherry Basque Cheesecake is a rich, creamy cheesecake with a caramelized top and juicy bursts of tart Polish cherries.
This Basque-style cheesecake is beautifully imperfect - baked at a high temperature to achieve a deeply golden, slightly cracked top, while staying irresistibly soft and creamy inside. The Polish frozen cherries add a bright, tangy contrast to the sweetness of the batter, creating a wonderful balance of flavors in every bite. No crust needed - just parchment paper and a hot oven for that signature rustic edge. It's perfect for 2–4 people, or a few indulgent servings over a few days.


Ingredients:

- 250 g cream cheese, room temperature
- 120 g heavy cream, room temperature
- 2 eggs, room temperature
- 60 g sugar
- 20 g flour or corn starch
- 100g sour cherries + 50g for the topping

Instructions:

1. Preheat the oven to 220°C (425°F). Prepare a 6-inch baking form by  lining the bottom with parchment paper.
2. In a mixing bowl, cream the room temperature cream cheese with sugar using a hand mixer or a stand mixer on medium speed until smooth and creamy.
3. Slowly add the room temperature eggs to the cream cheese mixture one at a time, beating well after each addition until fully incorporated.
4. Pour in the room temperature heavy cream, add flour and cherries, blend until smooth.
5. Pour the cheesecake batter into the prepared baking pan, smoothing the top with a spatula.
6. Add the remaining cherries on top of the cake.
7. Bake the cheesecake in the preheated oven for about 20 minutes or until the cheesecake is puffed, the top is set, and the center is slightly jiggly.
8. Once baked, remove the cheesecake from the oven and let it cool in the tin for about 30 minutes at room temperature.
9 Transfer the cheesecake to the refrigerator and chill it in the tin for about 4 hours or until set.
10. Once the cheesecake is fully set, carefully remove it from the tin, slice, and serve. 

Thursday, November 28, 2024

Brown Sugar Basque Cheesceake


Brown Sugar Basque cheesecake is a delicious variation of the classic Basque cheesecake, incorporating the rich flavor of brown sugar for a deeper, caramel-like sweetness. This cheesecake maintains the traditional characteristics of a Basque cheesecake, such as its creamy center and burnt, caramelized top, but the addition of brown sugar gives it a unique twist that enhances its overall flavor profile.
The caramel notes from the brown sugar add complexity, making it a delightful dessert for any occasion!
 

Ingredients

- 250 g cream cheese, room temperature
- 120 g heavy cream, room temperature
- 2 eggs, room temperature
- 80 g brown sugar
- 15 g flour

Instructions

1. Preheat the oven to 220°C (425°F). Prepare a 6-inch baking form by  lining the bottom with parchment paper.
2. In a mixing bowl, cream the room temperature cream cheese with sugar using a hand mixer or a stand mixer on medium speed until smooth and creamy.
3. Slowly add the room temperature eggs to the cream cheese mixture one at a time, beating well after each addition until fully incorporated.
4. Pour in the room temperature heavy cream, mixing until well combined.
5. Sift in the flour. Gradually fold the sifted flour into the cream cheese mixture until evenly combined, being careful not to overmix.
7. Pour the cheesecake batter into the prepared baking pan, smoothing the top with a spatula.
8. Bake the cheesecake in the preheated oven for about 20 minutes or until the cheesecake is puffed, the top is set, and the center is slightly jiggly.
9. Once baked, remove the cheesecake from the oven and let it cool in the tin for about 30 minutes at room temperature.
10. Transfer the cheesecake to the refrigerator and chill it in the tin for about 4 hours or until set.
11. Once the cheesecake is fully set, carefully remove it from the tin, slice, and serve. 

Friday, November 22, 2024

Blueberry Basque Cheesceake


A blueberry Basque cheesecake is a delightful twist on the classic Basque-style cheesecake, known for its creamy interior and deeply caramelized top. This version adds a fruity burst from blueberries, which pairs beautifully with the cheesecake’s rich and slightly tangy flavor. 

I absolutely adore Basque cheesecake ever since the first time I baked one. Now, I rarely make traditional cheesecake and instead keep experimenting with different Basque cheesecake flavors. For example, I tried a purple sweet potato version, and it turned out amazing!


Ingredients

- 250 g cream cheese, room temperature
- 120 g heavy cream, room temperature
- 2 eggs, room temperature
- 60 g sugar
- 25 g flour 
- 60g blueberries 

Instructions

1. Preheat the Oven: Set the oven to 220°C (425°F).
2. Prepare the Baking Form: Line the bottom of a 6-inch round baking pan with parchment paper.
3. Mix Cream Cheese and Sugar: In a mixing bowl, cream the room temperature cream cheese with sugar using a hand mixer or stand mixer on medium speed until smooth and creamy.
4. Add Eggs: Slowly add the room temperature eggs to the cream cheese mixture one at a time, beating well after each addition until fully incorporated.
5. Add Heavy Cream and Blueberry Puree: Pour in the room temperature heavy cream, and stir part of the blueberries. Mix until well combined.
6. Pour the Batter: Pour the cheesecake batter into the prepared baking pan, smoothing the top with a spatula. Add the remaining blueberries on top for decoration.
7. Bake: Bake the cheesecake in the preheated oven for about 20 minutes or until the top is set and slightly puffed. The center should still be slightly jiggly and the cake has caramelized colour.
8. Cool Down: Once baked, remove the cheesecake from the oven and let it cool in the pan for about 30 minutes at room temperature.
9. Chill: Transfer the cheesecake to the refrigerator and chill for about 4 hours or until fully set.
10. Serve: Once chilled, carefully remove the cheesecake from the pan, slice, and enjoy!

Monday, November 18, 2024

Purple Sweet Potato Basque Cheesecake


Purple sweet potato cheesecake is a vibrant and unique dessert that combines the creamy texture of cheesecake with the natural sweetness and earthy flavor of purple sweet potatoes. This cheesecake is often made using a traditional cheesecake base, incorporating cream cheese, sugar, eggs, and heavy cream, but with the addition of purple sweet potato puree, which not only adds a striking color but also infuses the cake with a subtle sweetness and a hint of nuttiness.

The cake's texture was a bit different due to the starchy nature of the sweet potatoes, which gave it a slightly grainy and sticky quality that was visible but didn’t bother me at all. However, not everyone may enjoy this unique texture, as it is quite different from traditional cheesecake.


Ingredients

- 250 g cream cheese, room temperature
- 120 g heavy cream, room temperature
- 2 eggs, room temperature
- 60 g sugar
- 100 g purple sweet potato puree
- 20 g sweet potato powder 

Instructions

1. Prepare the Sweet Potato Puree: Cook and mash the purple sweet potato until smooth. Let it cool completely.
2. Preheat the Oven: Set the oven to 220°C (425°F).
3. Prepare the Baking Form: Line the bottom of a 6-inch round baking pan with parchment paper.
4. Mix Cream Cheese and Sugar: In a mixing bowl, cream the room temperature cream cheese with sugar using a hand mixer or stand mixer on medium speed until smooth and creamy.
5. Add Eggs: Slowly add the room temperature eggs to the cream cheese mixture one at a time, beating well after each addition until fully incorporated.
6. Add Heavy Cream and Sweet Potato: Pour in the room temperature heavy cream, add the sweet potato puree, and the purple sweet potato powder. Blend until well combined. 
7. Pour the Batter: Pour the cheesecake batter into the prepared baking pan, smoothing the top with a spatula.
8. Bake: Bake the cheesecake in the preheated oven for about 20 minutes or until the top is set and caramelized. The center should still be slightly jiggly.
9. Cool Down: Once baked, remove the cheesecake from the oven and let it cool in the pan for about 30 minutes at room temperature.
10. Chill: Transfer the cheesecake to the refrigerator and chill for about 4 hours or until fully set.
11. Serve: Once chilled, carefully remove the cheesecake from the pan, slice, and enjoy!

Thursday, June 13, 2024

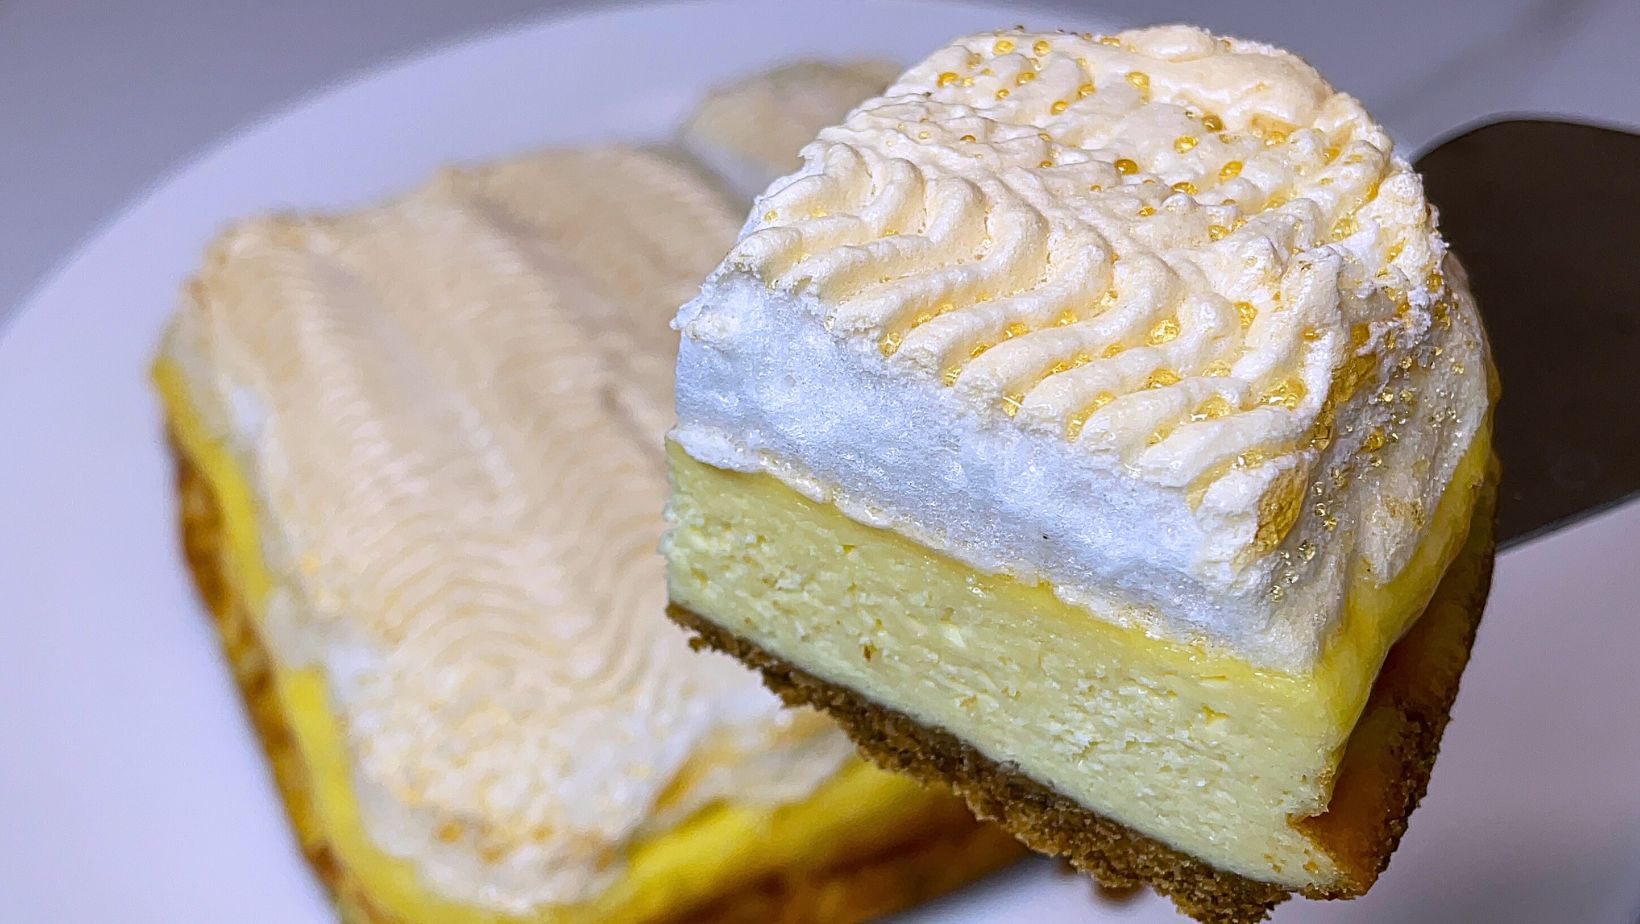
Teardrop Cheesecake (Crying Cheesecake) - Sernik Płaczący


Sernik Płaczący, also known as Teardrop Cheesecake or "Crying Cheesecake," is a popular Polish variation of traditional cheesecake with a unique feature: it "cries" or forms teardrop-like droplets on the top after baking. These droplets are formed from the condensation of the meringue-like layer that forms during cooling, creating a glossy, amber-colored "teardrop" effect on the cake’s surface. This effect gives the cheesecake its poetic name, making it visually distinctive as well as delicious.

The base is made of buttery, shortcrust pastry or biscuit base. The main layer is made with twaróg (Polish curd cheese or farmer’s cheese), eggs, sugar, and often vanilla or lemon zest. This part is similar to traditional sernik, with a rich and dense texture. On the top, a delicate layer of whipped egg whites and sugar, which creates a light and airy topping that browns slightly during baking. After the cheesecake cools, droplets form on the surface due to condensation from the moisture in the meringue-like topping. These droplets are typically golden in color and resemble tears, giving the cake its signature look.
The cake is subtly sweet with a rich cheese flavor, complemented by the light, airy top layer and sometimes a hint of citrus.
The cheesecake is often baked in a rectangular pan and cut into squares or rectangles, with the teardrop effect adding an eye-catching finish.

Ingredients:

Crust:

- 90g cookies (any type you prefer)
- 15g oil
- 15g water 

Cheesecake:

- 250g cream cheese
- 2 eggs + 1 egg yolk 
- 30g sugar

Meringue:

- 1 egg white
- 35g sugar

Instructions:

1. Prepare the Crust:
   - Crush the cookies into fine crumbs.
   - Mix the cookie crumbs with oil and water until well combined.
   - Press the mixture into the bottom of a greased or lined cake pan to form the crust.
2. Prepare the Cheesecake Filling:
   - In a mixing bowl, beat the cream cheese until smooth and creamy.
   - Add the eggs and sugar to the cream cheese, and continue beating until well combined and smooth.
3. Assemble and Bake the Cheesecake:
   - Pour the cheesecake filling over the crust.
   - Smooth out the top with a spatula.
   - Place in the oven and bake at 180 degrees Celsius for about 25-30 minutes.
4. Prepare the Meringue Topping:
   - In a clean mixing bowl, beat the egg white until foamy.
   - Gradually add the sugar while continuing to beat until stiff peaks form.
   - Prepare it about 10 minutes before cheesecake is finishing baking.
   - Spread the meringue topping evenly over the cheesecake filling layer.
   - Return the assembled cheesecake to the oven and bake at 150°C (300°F) for about 15 minutes.
7. Chill and Serve:
   - Once baked, remove the cheesecake from the oven and let it cool to room temperature.
   - Chill the cheesecake in the refrigerator for at least a few hours. The dew should appear after a few minutes.
   - Once set, slice and serve your delicious golden dew cheesecake.

Baking Tips

- The teardrop effect is caused by a combination of the high moisture content in the cheese and egg whites and the cooling process, so it's important not to rush the cooling. Let the cake cool slowly, first in the oven with the door ajar, then at room temperature.
- Using high-quality twaróg is key to achieving the best texture.
- Sernik Płaczący is a comforting and elegant dessert, perfect for holidays or special occasions in Poland, and the beautiful "teardrops" give it an added sense of tradition and charm.
- This cake can also be made with American or Australian-style cream cheese instead of traditional Polish twaróg. While it will result in a slightly different texture and flavor, the cake will still be delicious, with a smoother and creamier consistency compared to the grainier texture of twaróg. Use same ratio of ingredients.

Wednesday, May 22, 2024

Chocolate Chip Cookie Cheesecake


A delicious cheesecake with a chocolate chip cookie bottom, combining different textures and flavors. It's one of my favorite bakes.

Ingredients

Chocolate Chip Cookie Layer:

- 1 egg
- 60g brown sugar
- 45g oil
- 70g all-purpose flour
- 30g cornstarch
- 4g baking powder
- 60g chocolate chips

Cheesecake Layer:

- 250g cream cheese
- 2 eggs
- 40g sugar

Instructions

1. Preheat your oven to 180°C (350°F). Grease a round cake pan or line it with parchment paper.
2. Prepare Cookie Layer:
   - In a mixing bowl, beat together the egg, brown sugar, and oil until well combined.
   - Sift in the flour, cornstarch, and baking powder. Mix until a dough forms.
   - Fold in the chocolate chips until evenly distributed.
   - Pour into the prepared cake pan. Leave some to place on top of cheesecake.
   - Bake at 180 degree Celsius for 5 minutes.
3. Prepare Cheesecake Layer:
   - In another mixing bowl, beat the cream cheese with sugar until smooth and creamy.
   - Add the eggs gradually, and continue beating until well combined and smooth.
4.  Assemble and Bake:
   - Pour the cheesecake batter over the chocolate chip cookie layer.
   - Smooth out the top with a spatula.
   - Add the rest of the batter on top.
   - Optionally, sprinkle some additional chocolate chips.
   - Bake in the preheated oven for about 25-30 minutes, or until the cheesecake is set and the edges are slightly golden brown.
5. Cool and Serve:
   - Remove the cheesecake from the oven and let it cool in the pan for about 20-30 minutes.
   - Once cooled, carefully remove the cheesecake from the pan and transfer it to a serving plate.
   - Allow it to cool completely before slicing and serving.

Monday, April 22, 2024

Berry Mousse Cheesecake (No Bake)


A No-Bake Berry Whipped Cream Cheesecake is a creamy, light dessert with a biscuit base and a refreshing flavour, perfect for summer or any occasion. 

Ingredients

Crust:

- 100g cookies (any type you prefer)
- 15ml oil
- 15ml water

Filling:

- 250g cream cheese
- 60g sugar
- 100ml whipping cream
- 100g fruits, fresh or frozen (blueberries, cherries)
- 2 tbsp gelatin + 2 tbsp hot water

Instructions

1. Prepare a baking tin by lining it with parchment paper.
2. In a food processor, grind the cookies until they form fine crumbs. Add the oil and water to the cookie crumbs and mix until well combined.
3. Press the cookie mixture evenly into the bottom of the prepared baking tin to form the crust. Use the back of a spoon or a flat-bottomed glass to flatten the crust.
4. In a mixing bowl, beat the cream cheese and sugar together until smooth and creamy.
5. Pour in the whipping cream, melted gelatine and fruits. I used half-half frozen blueberries and cherries.
6. Blend everything until well combined.
7. Pour the cheesecake filling over the prepared crust in the baking tin, spreading it out evenly.
8. Place the cheesecake in the refrigerator to chill for 4-6 hours, or until set.
9. Once the cheesecake is set, remove it from the refrigerator and carefully unmold it from the baking tin.
10. Slice the cheesecake and serve chilled. 
11. You can garnish the cheesecake with extra blueberries or a drizzle of blueberry sauce for added flavor and presentation.

Friday, April 19, 2024

Matcha Basque Cheesecake


Basque Cheesecake, also known as Burnt Basque Cheesecake or Tarta de Queso, originates from the Basque Country in Spain, specifically from a restaurant called La Viña in San Sebastián. This cheesecake has gained immense popularity for its unique characteristics: a rich, creamy interior and a deeply caramelized, almost burnt exterior. 
Unlike traditional cheesecakes, Basque cheesecake is typically made without a crust, allowing the focus to be on the creamy filling. The cake is baked at a high temperature, which creates a dark, charred top that adds a smoky flavor and visually striking appearance. The interior is incredibly creamy and smooth, often compared to a creamy custard or flan, thanks to the use of cream cheese and heavy cream.

Basque Matcha Cheesecake is a unique variation of the traditional Basque Burnt Cheesecake, incorporating the earthy, slightly bitter flavor of matcha (Japanese green tea powder). It has a caramelized top, a creamy center, and a subtle green tea twist that makes it a beautiful and flavorful dessert.

Ingredients

- 250 g cream cheese, room temperature
- 120 g heavy cream, room temperature
- 2 eggs, room temperature
- 60 g sugar
- 10 g flour
- 15 g matcha powder

Instructions

1. Preheat the oven to 220°C (425°F). Prepare a 6-inch baking form by  lining it with parchment paper.
2. In a mixing bowl, cream the room temperature cream cheese with sugar using a hand mixer or a stand mixer on medium speed until smooth and creamy.
3. Slowly add the room temperature eggs to the cream cheese mixture one at a time, beating well after each addition until fully incorporated.
4. Pour in the room temperature heavy cream, mixing until well combined.
5. Ssift in the flour and matcha powder.
6. Gradually fold the sifted flour and matcha powder into the cream cheese mixture until evenly combined, being careful not to overmix. 
7. Pour the cheesecake batter into the prepared baking pan, smoothing the top with a spatula.
8. Bake the cheesecake in the preheated oven for about 20 minutes or until the cheesecake is puffed, the top is caramelized, the sides are baked, and the center is slightly jiggly.
9. Once baked, remove the cheesecake from the oven and let it cool in the tin for about 30 minutes at room temperature.
10. Transfer the cheesecake to the refrigerator and chill it in the tin for about 4 hours or until set.
11. Once the cheesecake is fully set, carefully remove it from the tin, slice, and serve. 

Friday, April 12, 2024

Polish Sweet Cheese Strudel With Walnuts and Raisins - Strucla z Serem


Strucla serowa, or Sweet Cheese Strudel, is Polish cake crafted from yeast-raised dough, generously filled with a mixture of cheese (typically Farmer's Cheese, known as Twaróg), and then baked until golden. Since I can't find the specified type of cheese, I substitute it with Cream Cheese, commonly used in American-style Cheesecakes. To enhance its texture, I incorporated raisins and walnuts into the filling. 
While Strucla serowa is a popular choice, the most common type of strudel in Poland remains Makowiec, the Polish Poppy Seed Roll. 

I baked mine in a mold, but it's optional. You can bake it without any mold, resulting in a roll cake appearance.
It's a delightful pastry that pairs wonderfully with a cup of tea or coffee, making it a favorite for breakfast, dessert, or any time of day. As it's made of yeast dough, so it's best enjoyed fresh, but you can also store it in an airtight container for up to 3 days.


Ingredients

Dough:

- 180g all-purpose flour
- 5g instant yeast
- 60ml warm milk
- 1 egg
- 50g sugar
- 35ml oil

Filling:

- 200g cream cheese
- 1 egg
- 20g sugar
- 30g raisins
- 30g walnuts

Toppings:

- Icing

Instructions

1. In a mixing bowl, combine the flour and instant yeast.
2. Add the warm milk, egg, sugar, and oil to the bowl with the flour mixture. 
3. Mix until a soft elastic dough forms, preferably kneading for about 10 minutes. 
4. Cover the dough with a cloth and leave it to rise in a warm place for 40-60 minutes.
5. Meanwhile, prepare the cream cheese filling by thoroughly mixing the cream cheese, egg, and sugar until smooth.
6. After the dough has risen, punch it down with your hand to degas it.
7. Roll out the dough into a rectangle with one side at least 12 cm (the size of your baking tin). 
8. Spread the cream cheese filling evenly over the surface of the dough, leaving the edges free.
9. Add raisins and walnuts (you can ommit if you want to).
10. Roll the dough into a tight roll and then cut it lengthwise with a sharp knife, dividing it into two parts but leaving one edge glued together.
11. Twist the two strips together and place them in a greased and lined cake tin (12×7 cm) or on a baking sheet (it willl be flatter if you don't use baking tin. 
12. Leave for at least 1 hour to rise.
13. Preheat the oven to 180°C.
14. Brush the cake with milk or egg wash before placing in the oven.
15. Bake for about 45-50 minutes, or until golden brown and cooked through. Leave to cool it down.
16. After baking, drizzle with icing. 
You can also sprinkle with almond flakes, candied orange peel, and/or dried cranberries or raisins up to your taste.

Thursday, September 14, 2023

Baked Cheesecake-filled Mooncakes


Mooncakes with cheesecake filling offer a unique twist on the traditional Chinese pastry. These mooncakes combine the rich and creamy texture of cheesecake with the flaky and tender exterior of the mooncake crust. The cheesecake filling adds a delightful richness that complements the sweetness of the mooncake dough.
These cheesecake-filled mooncakes are perfect for celebrating special occasions such as the Mid-Autumn Festival or as a delightful dessert any time of the year. They can be enjoyed on their own or paired with a cup of tea for a delightful treat.

Ingredients

Dough:

- 150g flour
- 80g golden syrup or honey
- 30g oil
- 1/3 teaspoon Kansui (lye water)

Cheesecake:

- 250g cream cheese, at room temperature
- 2 eggs
- 30g sugar

Egg Wash:

- 1 egg yolk
- 1 tbsp water

Instructions

1. Preparing Cheesecake Filling:
- Mix cream cheese (at room temperature) with sugar until smooth.
- Add eggs one at a time, mixing thoroughly after each addition.
- Bake the cheesecake in a 6-inch square pan at 200 degrees Celsius for 15-20 minutes, or until set.
- Allow the baked cheesecake to cool, then divide it into 12 pieces, each weighing 30g.
2. Preparing Mooncake Crust:
- Mix all dough ingredients until a smooth dough forms.
- Divide the dough into 12 pieces, each weighing 20g.
3. Assembling:
- Roll or flatten a piece of dough in your hand.
- Place a portion of the cheesecake filling (30g) in the center of the dough.
- Cover the filling with the dough and roll it into a ball.
- Repeat this process with each piece of dough and cheesecake filling.
4. Mooncake Molding:
- Dust the mooncake mold with flour or cornstarch.
- Place each filled dough ball into the mold and press gently to shape.
5. Baking:
- Preheat the oven to 190 degrees Celsius.
- Place the shaped mooncakes on a baking tray and bake for 5 minutes.
- Remove the mooncakes from the oven and brush them gently with egg wash.
- Return the mooncakes to the oven and bake for an additional 20-25 minutes at 170 degrees Celsius, or until golden brown.
6. Storing:
- Allow the baked mooncakes to cool completely.
- Store them in an airtight container in the refrigerator for up to 2 weeks.

Monday, August 21, 2023

Japanese Souffle Cheesecake


Japanese soufflé cheesecake, also known as cotton cheesecake or Japanese cheesecake, is a light and fluffy dessert with a delicate texture. It's made using cream cheese, eggs, sugar, and a small amount of flour, which are whipped together to create a smooth and airy batter. The key to its distinctive texture is the addition of beaten egg whites, which are folded into the batter to give it volume and lift. When baked, the cheesecake puffs up and rises like a soufflé, hence its name. The result is a creamy and airy cheesecake that's less dense than traditional New York-style cheesecake. It's often enjoyed plain or with a dusting of powdered sugar, but it can also be served with fruit compote or whipped cream for added flavor.

When I first tried Japanese cheesecake, I wasn't a fan. I was accustomed to our dense, sweet cheesecake that we eat back in Poland. A few years passed, and I decided to make Japanese souffle cheesecake myself. I feel it isn't as bad as I initially thought! I wouldn't consider it a traditional cheesecake, but more of a cheese-flavored sponge cake, mainly due to its texture, though.


Ingredients

- 50g sugar
- 3 eggs (separate yolks and whites)
- 120g cream cheese
- 50ml milk
- 30g all-purpose flour
- 10g potato or corn starch

Instructions

1. Preheat your oven to 200°C (392°F) and line a 6-inch cake pan with parchment paper.
2. Separate the egg whites from the yolks.
3. Beat the egg whites until stiff peaks form.
4. In a bowl, combine cream cheese with sugar.
5. Add the egg yolks to the cream cheese mixture and mix well.
6. Sift the flour and add it to the mixture, stirring until well combined.
7. Gently fold the beaten egg whites into the cheese mixture until smooth and fully incorporated.
8. Pour the batter into the prepared cake pan.
9. Prepare a water bath for baking.
10. Bake the cheesecake in the preheated oven at 200°C (392°F) for 20 minutes.
11. After 20 minutes, reduce the oven temperature to 140°C (284°F) and continue baking for an additional 30 minutes.
12. Once baked, let the cheesecake cool in the oven with the door slightly ajar for about 15-20 minutes.
13. Afterward, transfer the cheesecake to a wire rack to cool completely.

*For the best results, consider baking the cheesecake in a water bath to ensure a moist and even texture. 

Sunday, May 28, 2023

Brownie Bottom Cherry Cheesecake


Cherries aren't a common fruit in Taiwan, so I felt lucky when I found some frozen ones from Poland! They had a sour taste, so I didn't enjoy eating them on their own, but they were fantastic in a cake, adding extra flavor.

Ingredients

Brownie:

- 1 egg
- 70g brown sugar
- 60 ml oil
- 50g cornstarch
- 30g cocoa powder

Cheesecake:

- 250g cream cheese
- 2 eggs
- 35g sugar
- 60g cherries, fresh or frozen

Instructions

1. Preheat your oven to 180°C (350°F). Grease a round cake pan or line it with parchment paper.
2. Prepare Brownie Bottom:
   - In a mixing bowl, beat together the egg, brown sugar, and oil until well combined.
   - Sift in the cornstarch and cocoa powder. Mix until smooth and well combined.
   - Pour the brownie batter into the bottom of the prepared cake pan and spread it out evenly. Reserve some for the topping.
   - Bake at 180 degree Celsius for 10 minutes.
3. Prepare Cheesecake Layer:
   - In another mixing bowl, beat the cream cheese until smooth and creamy.
   - Add the eggs and sugar, and continue beating until well combined and smooth.
4. Assemble:
   - Pour the cheesecake batter over the brownie layer.
   - Smooth out the top with a spatula.
   - Arrange the cherries on top of the cheesecake layer and add the rest of brownie batter.
5. Bake in the preheated oven for about 25-30 minutes, or until the cheesecake is set and the edges are slightly golden brown.
6. Cool and Serve:
   - Remove the cheesecake from the oven and let it cool in the pan for about 20-30 minutes.
   - Once cooled, carefully remove the cheesecake from the pan and transfer it to a serving plate.
   - Allow it to cool completely before slicing and serving.

Wednesday, June 22, 2022

Chocolate Basque Cheesecake


Basque Cheesecake, also known as Burnt Basque Cheesecake or Tarta de Queso, originates from the Basque Country in Spain, specifically from a restaurant called La Viña in San Sebastián. This cheesecake has gained immense popularity for its unique characteristics: a rich, creamy interior and a deeply caramelized, almost burnt exterior. 
Unlike traditional cheesecakes, Basque cheesecake is typically made without a crust, allowing the focus to be on the creamy filling. The cake is baked at a high temperature, which creates a dark, charred top that adds a smoky flavor and visually striking appearance. The interior is incredibly creamy and smooth, often compared to a creamy custard or flan, thanks to the use of cream cheese and heavy cream.


Ingredients

- 250 g cream cheese, room temperature
- 120 g heavy cream, room temperature
- 2 eggs, room temperature
- 60 g sugar
- 10 g flour
- 80 g melted chocolate (dark or milk)
- 15 g cocoa powder

Instructions

1. Preheat the oven to 220°C (425°F). Prepare a 6-inch baking form by lining the bottom with parchment paper.
2. In a mixing bowl, cream the room temperature cream cheese with sugar using a hand mixer or a stand mixer on medium speed until smooth and creamy.
3. Slowly add the room temperature eggs to the cream cheese mixture one at a time, beating well after each addition until fully incorporated.
4. Pour in the room temperature heavy cream, mixing until well combined.
5. Melt the chocolate in a heatproof bowl over a pot of simmering water or in short bursts in the microwave until smooth. Let it cool slightly.
6. Pour the melted chocolate into the cream cheese mixture and fold until fully incorporated.
7. Sift in the flour and cocoa powder, gradually fold until evenly combined.
8. Pour the cheesecake batter into the prepared baking pan, smoothing the top with a spatula.
9. Bake the cheesecake in the preheated oven for about 20 minutes or until the cheesecake is puffed, the top is set, and the center is slightly jiggly.
10. Once baked, remove the cheesecake from the oven and let it cool in the tin for about 30 minutes at room temperature.
11. Transfer the cheesecake to the refrigerator and chill it in the tin for about 4 hours or until set.
12. Once the cheesecake is fully set, carefully remove it from the tin, slice, and serve. 

Saturday, April 2, 2022

Basque Cheesecake


Basque Cheesecake, also known as Burnt Basque Cheesecake or Tarta de Queso, originates from the Basque Country in Spain, specifically from a restaurant called La Viña in San Sebastián. This cheesecake has gained immense popularity for its unique characteristics: a rich, creamy interior and a deeply caramelized, almost burnt exterior. 
Unlike traditional cheesecakes, Basque cheesecake is typically made without a crust, allowing the focus to be on the creamy filling. The cake is baked at a high temperature, which creates a dark, charred top that adds a smoky flavor and visually striking appearance. The interior is incredibly creamy and smooth, often compared to a creamy custard or flan, thanks to the use of cream cheese and heavy cream.


Ingredients

- 250 g cream cheese, room temperature
- 120 g heavy cream, room temperature
- 2 eggs, room temperature
- 60 g sugar
- 10 g flour

Instructions

1. Preheat the Oven:
   - Preheat your oven to **220°C (425°F). This high temperature helps create a beautifully puffed cheesecake.
   - Prepare a 6-inch baking form (springform pan is recommended) by lining the bottom with parchment paper. This will help prevent sticking and make it easier to remove the cheesecake later.
2. Cream the Cream Cheese:
   - In a mixing bowl, add cream cheese that has been left out to reach room temperature. 
   - Using a hand mixer or a stand mixer fitted with a paddle attachment, beat the cream cheese on medium speed until it is smooth and creamy, about 2-3 minutes. Scrape down the sides of the bowl as needed.
3. Add the Eggs:
   - With the mixer running, slowly add the room temperature eggs one at a time to the cream cheese mixture.
   - Beat well after each addition, making sure each egg is fully incorporated before adding the next. This should take about 1 minute per egg. The mixture should be smooth and slightly fluffy.
4. Incorporate the Heavy Cream:
   - Pour in 200 ml of heavy cream (also at room temperature) into the cream cheese mixture.
   - Mix on low speed until well combined, ensuring there are no lumps. The batter should be smooth and creamy.
5. Add the Flour:
   - Sift flour directly into the cream cheese mixture.
   - Using a spatula or a wooden spoon, gently fold the sifted flour into the batter. Be careful not to overmix; you want to maintain the lightness of the batter while ensuring it is fully combined.
6. Pour the Batter:
   - Pour the cheesecake batter into the prepared baking pan. Use a spatula to smooth the top evenly. This will help create an even surface for baking.
7. Bake the Cheesecake:
   - Place the baking pan in the preheated oven. Bake the cheesecake for about 20 minutes.
   - The cheesecake should be puffed, the top set, and the center should still be slightly jiggly. This slight jiggle is normal and indicates a creamy texture.
8. Cool the Cheesecake:
   - Once baked, remove the cheesecake from the oven. Let it cool in the tin for about 30 minutes at room temperature. This gradual cooling helps prevent cracks in the cheesecake.
9. Chill in the Refrigerator:
   - After 30 minutes, transfer the cheesecake (still in the pan) to the refrigerator.
   - Chill for about 4 hours or until the cheesecake is fully set. This step is crucial for achieving the right texture.
10. Serve:
   - Once the cheesecake is fully set, carefully remove it from the tin. If using a springform pan, simply release the sides. If using a regular pan, you can run a knife around the edges to help loosen it.
   - Slice the cheesecake using a sharp knife (wiping it clean between slices for neat edges) and serve.